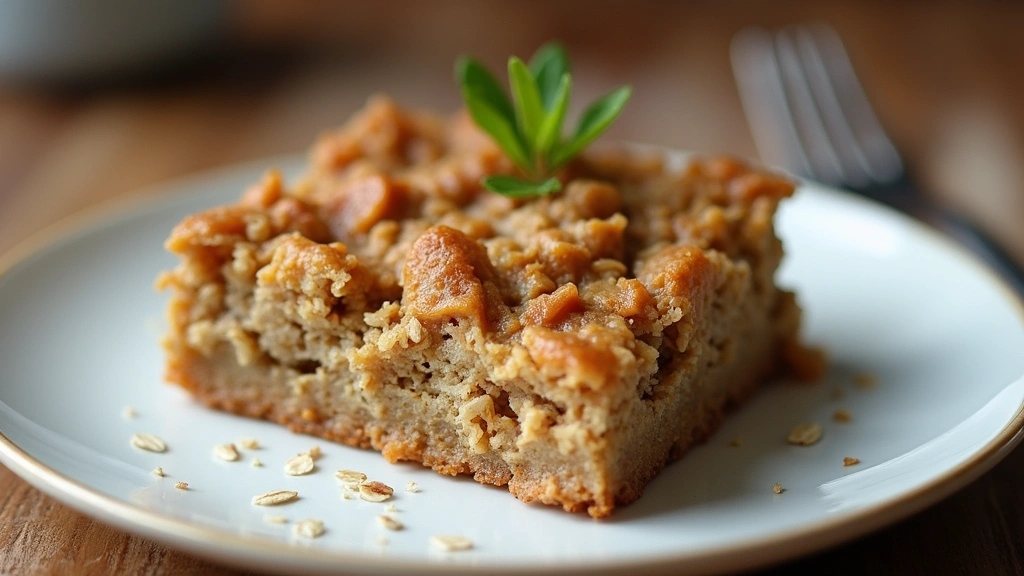
Baked oatmeal bars are a delightful way to start your day, offering a wholesome blend of flavors and textures that are both satisfying and nutritious.
These bars are perfect for busy mornings, providing a convenient grab-and-go option packed with fiber and protein.
I first fell in love with baked oatmeal bars during a family camping trip, where we enjoyed them warm by the campfire, their aroma filling the air.
The combination of sweet fruits, hearty oats, and a hint of cinnamon creates a comforting breakfast that feels indulgent yet healthy.
The History and Cultural Significance
• Baked oatmeal bars trace their origins to early American breakfast traditions, where oats were a staple ingredient for their nutritional value and heartiness.
• The dish evolved over decades as home cooks began to experiment with flavors and ingredients, adding fruits, nuts, and spices to enhance the basic recipe.
• In many cultures, oatmeal is a symbol of comfort and sustenance, often served during cold mornings or as a hearty meal for workers.
• While many variations exist across different regions, the authentic version maintains the use of whole oats and simple ingredients that nourish the body and soul.
Recipe Overview
Nutritional Information (per serving)
Ingredients
Essential Equipment Guide
Mixing Bowl: A sturdy mixing bowl is essential for combining the wet and dry ingredients effectively. Look for one that is large enough to prevent spills and is easy to clean.
Baking Dish: A 9×13 inch baking dish is ideal for creating perfectly sized bars. Consider using a glass dish for even baking or a non-stick option for easy release.
Wooden Spoon or Spatula: These tools are perfect for mixing your ingredients without damaging your bowls. A sturdy wooden spoon helps combine everything evenly, ensuring no dry ingredients are left behind.
Preparation Methods
Mixing Dry and Wet Ingredients: This technique is crucial for achieving the right texture in your bars. Start by combining the dry ingredients in one bowl and the wet in another, which helps prevent clumping and ensures even distribution of flavors.
Layering Flavors: To enhance the taste, add your mix-ins gradually. This allows the oats to absorb the flavors better, creating a deliciously cohesive bar.
Testing Doneness: When baking, it’s important to check for doneness by inserting a toothpick in the center. If it comes out clean or with just a few crumbs, your bars are ready.
Step 1: Preheat the Oven

Begin by preheating your oven to 350°F (175°C).
This step is crucial for even baking.
Preheating ensures that your bars rise properly and achieve a golden brown top.
Make sure to give the oven enough time to reach the required temperature before placing your dish inside.
Step 2: Prepare the Baking Dish

Grease a 9×13 inch baking dish with cooking spray or line it with parchment paper.
This will prevent the oatmeal bars from sticking and make for easy removal.
Ensure that the entire bottom and sides are covered to avoid any sticking.
Using parchment paper can also make cleanup easier.
Step 3: Mix Dry Ingredients

In a large mixing bowl, combine the rolled oats, baking powder, and cinnamon.
Use a whisk or fork to ensure all dry ingredients are evenly mixed.
This step is important to avoid clumping and ensures that the baking powder is evenly distributed.
Set this bowl aside while you prepare the wet ingredients.
Step 4: Combine Wet Ingredients

In another bowl, mash the bananas until smooth, then add the egg, milk, and maple syrup.
Whisk these together until well blended and smooth.
This mixture will add moisture and sweetness to your bars.
Make sure there are no lumps from the bananas for a consistent texture.
Step 5: Combine Wet and Dry Mixtures

Pour the wet ingredients into the bowl with the dry ingredients.
Stir gently until just combined; do not overmix.
Overmixing can lead to dense bars, so aim for a few lumps to remain.
Ensure all the dry ingredients are moistened before moving to the next step.
Step 6: Add Mix-Ins

Fold in the berries and chopped nuts into the mixture.
This adds flavor and texture to your bars, making them more enjoyable.
Be gentle while folding to prevent crushing the berries.
Ensure that the mix-ins are evenly distributed throughout the batter.
Step 7: Transfer to Baking Dish

Spoon the mixture into the prepared baking dish, spreading it evenly.
Use a spatula to smooth the top for even baking.
This step ensures that the bars cook uniformly and have a nice shape.
Press gently to compact the mixture slightly.
Step 8: Bake the Bars

Place the baking dish in the preheated oven and bake for 25-30 minutes.
The bars are done when they are golden brown on top and a toothpick inserted in the center comes out clean.
Keep an eye on them to prevent overbaking, which can lead to dryness.
Let them cool in the pan for about 10 minutes before cutting.
Step 9: Cool and Slice

Once cooled, carefully lift the bars out of the baking dish using the parchment paper.
Place them on a cutting board and slice them into squares or rectangles.
This ensures you get even pieces, making them easier to grab in the mornings.
Store any leftovers in an airtight container to keep them fresh.
Critical Timing and Temperature Guide
Baking Time: Bake the bars for 25-30 minutes at 350°F (175°C). They should turn golden brown on top, and a toothpick should come out clean when inserted.
Cooling Time: Allow the bars to cool for at least 10 minutes in the pan before removing. This helps them set properly and makes slicing easier.
Storage Temperature: Store the bars in an airtight container at room temperature for up to 5 days or in the fridge for up to 1 week.
Pro Tips for Baked Oatmeal Bars Healthy Breakfast Recipes For Busy Mornings
• Ingredient Selection: Use old-fashioned rolled oats for the best texture; quick oats can make the bars mushy.
• Preparation Secret: Let the mixture sit for a few minutes before baking to allow the oats to absorb the wet ingredients for a better texture.
• Temperature Management: Ensure all ingredients are at room temperature before mixing; this helps them combine easily.
• Texture Enhancement: Add a tablespoon of chia seeds for extra fiber and a slight crunch.
• Flavor Layering: Experiment with different spices like nutmeg or vanilla extract for added depth.
• Make-Ahead Strategies: Prepare the batter the night before and bake it in the morning for a quick breakfast.
• Restaurant-Quality Finishing Touches: Drizzle with honey or maple syrup before serving for an elegant touch.
• Equipment Optimization: Use a silicone spatula for easy mixing and scraping, ensuring you get every bit of batter.
Troubleshooting Common Issues
• Bars Too Crumbly: This can happen if there isn’t enough binding from the egg or banana. Make sure to measure your wet ingredients accurately and consider adding a bit more mashed banana or an extra egg.
• Too Dense: Overmixing can lead to dense bars. Combine wet and dry ingredients until just mixed to maintain a light texture.
• Flavor Lacking: If the bars taste bland, try adding more spices or a pinch of salt to enhance flavors. Vanilla extract is also a great flavor booster.
• Baking Unevenly: Ensure your oven is calibrated correctly. Rotate the baking dish halfway through baking for even cooking.
• Sticking to the Pan: Using parchment paper is key for easy removal. If you skip it, be sure to grease the pan generously.
Variations and Regional Differences
• Fruit Variations: In some regions, baked oatmeal bars are made with apples or peaches instead of bananas, lending a different sweetness and moisture.
• Nuts and Seeds: Certain cultures incorporate seeds like sunflower or pumpkin for added texture and nutrition, showcasing local ingredients.
• Spice Variations: In the fall, adding pumpkin spice or nutmeg can give these bars a seasonal flair, popular in many American households.
• Modern Interpretations: Today, many health-conscious cooks adapt the recipe to include protein powders or gluten-free oats to meet dietary needs.
Food Science Behind the Recipe
• Gelatinization: When oats are baked, the starches gelatinize, which helps the bars hold together and gives them a pleasant texture.
• Maillard Reaction: The browning that occurs during baking is due to the Maillard reaction, which enhances flavor and gives a visually appealing crust.
• Emulsification: The egg acts as an emulsifier, helping to combine the fats and liquids in the recipe for a uniform mixture.
Frequently Asked Questions
What’s the most common mistake people make when preparing baked oatmeal bars? The most common mistake is overmixing the batter, which can lead to dense bars. Make sure to combine just until mixed.
Can I prepare components of this dish in advance? Yes, you can mix the dry ingredients ahead of time and store them in an airtight container for up to a week.
How do I adapt this recipe for dietary restrictions? Use almond or oat milk for dairy-free options and substitute the egg with a flaxseed meal for a vegan version.
What’s the best way to store and reheat leftovers? Store in an airtight container at room temperature for 3-5 days. Reheat in the microwave for 20-30 seconds until warm.
Can I freeze this dish? Yes, freeze individual bars wrapped tightly in plastic wrap and then in a freezer bag for up to 3 months. Thaw overnight in the fridge before reheating.
What wine or beverages pair best with this dish? A light, fruity herbal tea or a fresh-squeezed juice complements the flavors well.
How can I scale this recipe up for a crowd? Double the ingredients and use two baking dishes to ensure even cooking.
What side dishes complement this recipe best? Greek yogurt with honey or a fruit salad pairs beautifully with these bars.
How do professional chefs elevate this dish for restaurant service? They often add gourmet toppings like candied nuts or a drizzle of artisanal honey for a refined touch.
Serving and Presentation Guide
• Traditional Presentation: Serve the bars on a rustic wooden board, garnished with fresh berries and a drizzle of honey.
• Modern Plating Ideas: Stack the bars vertically with a dusting of powdered sugar and a side of yogurt for a sleek, contemporary look.
• Accompaniment Suggestions: Pair with a fresh fruit salad or a smoothie to round out the meal.
• Special Occasion Presentation: Arrange the bars on a decorative platter with edible flowers or mint leaves for an elegant touch.
Conclusion
I hope you enjoy making these delicious baked oatmeal bars as much as I do.
They are perfect for busy mornings and can be customized to your taste.
Give this recipe a try, and savor the warmth and comfort they bring to your breakfast routine.