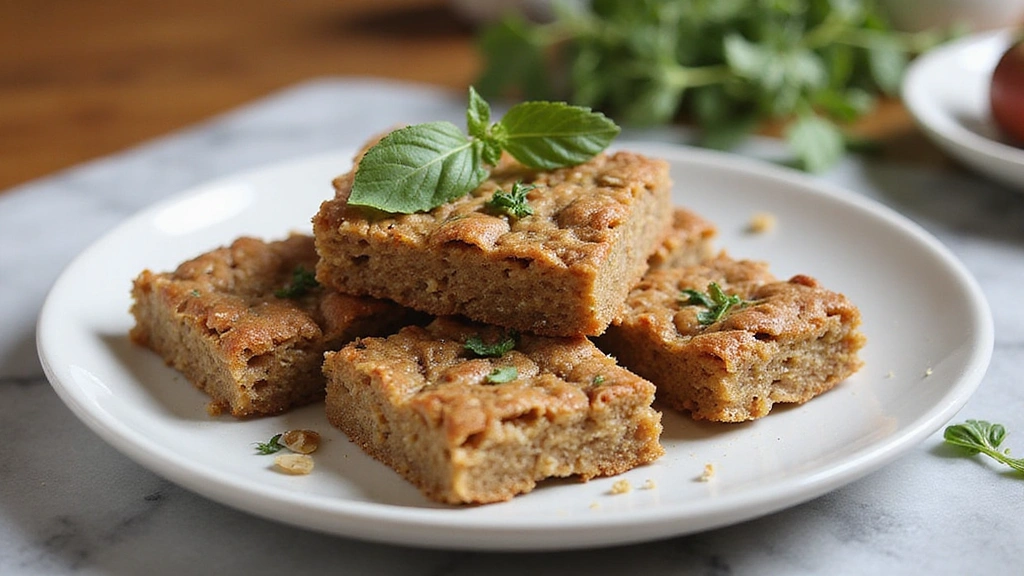
These Oatmeal Breakfast Bars are a delightful way to start your day with a burst of energy and flavor.
Packed with wholesome ingredients, they strike the perfect balance between chewy and crunchy with hints of sweetness.
I stumbled upon this recipe while looking for a healthy on-the-go breakfast option that wouldn’t compromise on taste.
Whether you’re rushing out the door or enjoying a quiet morning at home, these bars are sure to become a family favorite.
The History and Cultural Significance
• Oatmeal Breakfast Bars Gluten Free Healthy Recipes You’ll Love traces its origins to the early 20th century, when health-conscious bakers began experimenting with oats for their nutritional benefits.
• The dish evolved over decades as more gluten-free alternatives became available, eventually becoming a staple in many households looking for healthy snacks.
• In the United States, these bars often appear at breakfast tables and school lunches, symbolizing a shift towards healthier, convenient eating.
• While many variations exist across different regions, the authentic version maintains the use of oats as the primary ingredient, which sets it apart from traditional granola bars.
Recipe Overview
Nutritional Information (per serving)
Ingredients
Essential Equipment Guide
Mixing Bowl: A large mixing bowl is essential for combining wet and dry ingredients evenly. Look for one that is sturdy and non-slip to avoid spills when mixing.
Baking Pan: A 9×13 inch baking pan is ideal for these bars, allowing them to cook evenly. Choose one with a non-stick surface for easy removal of the bars.
Spatula: A rubber or silicone spatula is perfect for folding ingredients together and scraping down the sides of the bowl. Ensure it is heat-resistant for versatile use.
Preparation Methods
Mashing Bananas: To achieve the right texture, use ripe bananas as they are sweeter and easier to mash. Ensure they are well-mashed to avoid chunks in the bars, which could disrupt the texture.
Mixing Ingredients: Combine wet and dry ingredients separately before mixing to ensure even distribution of the leavening agent. This technique helps create a uniform batter, resulting in consistent baking.
Pressing the Mixture: When transferring the mixture to the baking pan, press it down firmly with a spatula to ensure the bars hold together after baking. This step is crucial for achieving a chewy texture.
Step 1: Preheat the Oven

Begin by preheating your oven to 350°F (175°C).
This step ensures that your bars bake evenly.
A well-preheated oven helps achieve a nice golden brown on the edges of the bars.
Double-check the temperature with an oven thermometer if needed.
Step 2: Prepare the Baking Pan

Line a 9×13 inch baking pan with parchment paper.
Leave some overhang on the sides for easy removal of the bars later.
This prevents sticking and makes cutting the bars much easier.
Make sure the parchment paper is pressed into the corners of the pan.
Step 3: Mash the Bananas

In a mixing bowl, add the ripe bananas and mash them thoroughly with a fork or potato masher.
Aim for a smooth consistency without large chunks.
This will help bind all the ingredients together effectively.
Ripe bananas are sweeter and provide better flavor.
Step 4: Combine Wet Ingredients

Add honey, peanut butter, and vanilla extract to the mashed bananas and stir until well combined.
The mixture should be smooth and cohesive.
This step ensures that the flavors meld together before adding dry ingredients.
Use a spatula to scrape down the sides of the bowl for thorough mixing.
Step 5: Mix Dry Ingredients

In a separate bowl, combine gluten-free rolled oats and baking powder.
Make sure to stir them well to evenly distribute the baking powder.
This step is crucial for achieving the right texture in the bars.
Use a whisk for better aeration if necessary.
Step 6: Combine All Ingredients

Pour the dry ingredient mixture into the wet ingredients bowl.
Fold them together gently using a spatula until just combined.
Be careful not to overmix, as this could make the bars dense.
Add in your chocolate chips and chopped nuts at this stage.
Step 7: Press Mixture into the Pan

Transfer the mixture to the prepared baking pan and spread it evenly.
Press down firmly with a spatula to ensure it holds together.
This step is essential for preventing the bars from crumbling after baking.
Make sure to create an even layer.
Step 8: Bake the Bars

Place the baking pan in the preheated oven and bake for 25 minutes.
Look for a golden-brown color around the edges as an indicator of doneness.
Allowing them to cool slightly before cutting helps maintain their shape.
Set a timer to avoid overbaking.
Step 9: Cool and Cut

Once baked, remove the pan from the oven and let it cool for about 10 minutes.
Use the parchment overhang to lift the bars out of the pan.
Place them on a cutting board and slice into squares or rectangles.
Store any leftovers in an airtight container.
Critical Timing and Temperature Guide
Baking Time: Bake for exactly 25 minutes at 350°F (175°C). The bars should be golden brown and firm to the touch. Avoid opening the oven door frequently as this can affect baking temperature.
Cooling Time: Allow the bars to cool for at least 10 minutes in the pan before cutting. This helps them firm up and maintain their shape without crumbling.
Storage Temperature: Store the bars at room temperature for up to 5 days in an airtight container. For longer storage, refrigerate them to extend their freshness.
Pro Tips for Oatmeal Breakfast Bars Gluten Free Healthy Recipes You’ll Love
• Ingredient Selection: Use the ripest bananas possible for maximum sweetness and best texture. The right peanut butter also enhances flavor; opt for natural varieties without additives.
• Preparation Secret: Mashing the bananas until completely smooth prevents any lumps in the final product, ensuring an even texture.
• Temperature Management: Ensure all ingredients are at room temperature for better mixing and incorporation, especially the peanut butter, which can be thick when cold.
• Texture Enhancement: Pressing the mixture firmly into the pan is key to achieving a chewy, cohesive bar that won’t crumble.
• Flavor Layering: Experiment with adding spices like cinnamon or nutmeg to the dry ingredients for an extra flavor boost.
• Make-Ahead Strategies: Prepare and bake these bars on the weekend, then store in the fridge for a quick breakfast throughout the week.
• Restaurant-Quality Finishing Touches: Drizzle melted dark chocolate over the bars after cutting for a gourmet look and added flavor.
• Equipment Optimization: Use a food processor for mashing bananas if you want to save time and achieve a super-smooth consistency.
Troubleshooting Common Issues
• Bars Too Crumbly: This can happen if the mixture wasn’t pressed firmly into the pan or if there wasn’t enough moisture. To fix, ensure to press down well and consider adding a tablespoon of milk or more peanut butter next time.
• Bars Too Dense: Overmixing the batter can lead to density. To prevent this, mix just until combined and avoid excessive stirring once the dry ingredients are added.
• Flavor Too Bland: If the bars lack flavor, consider increasing the amount of vanilla extract or adding spices like cinnamon. Taste the mixture before baking to adjust flavors as needed.
• Baking Unevenly: If the bars brown unevenly, ensure your oven racks are level and that the pan is centered in the oven. Rotate the pan halfway through baking for even cooking.
• Too Sweet or Not Sweet Enough: Adjust the amount of honey or choose different mix-ins like unsweetened chocolate chips if the bars are too sweet. Taste the batter for sweetness before baking for adjustments.
Variations and Regional Differences
• Nut-Free Version: Replace peanut butter with sun butter or a similar nut-free alternative to cater to nut allergies while maintaining a similar texture and flavor.
• Spiced Version: Add a teaspoon of pumpkin pie spice or cinnamon to the dry ingredients to create a warm, spiced flavor profile, perfect for fall.
• Fruit-Loaded Variation: Incorporate fresh fruit like blueberries or chopped apples into the mixture for added moisture and flavor.
• Vegan Adaptation: Substitute honey with maple syrup or agave nectar and ensure the chocolate chips are dairy-free to create a fully vegan-friendly bar.
Food Science Behind the Recipe
• Binding Properties of Bananas: Ripe bananas contain pectin and natural sugars that act as a binder, helping to hold the bars together while adding sweetness and moisture.
• Oat Structure: Oats are rich in soluble fiber, which helps in creating a chewy texture while also providing health benefits, such as lowering cholesterol.
• Baking Powder Activation: The baking powder releases carbon dioxide when heated, which helps the bars to rise slightly, creating a lighter texture compared to denser recipes.
Frequently Asked Questions
What’s the most common mistake people make when preparing Oatmeal Breakfast Bars? The most common mistake is overmixing the batter, which can lead to dense bars. To prevent this, mix just until combined.
Can I prepare components of this dish in advance? Yes, you can mash the bananas and mix the dry ingredients a day ahead. Store them separately in the refrigerator until you’re ready to bake.
How do I adapt this recipe for dietary restrictions? Substitute honey with maple syrup for a vegan option and select nut-free alternatives to accommodate allergies.
What’s the best way to store and reheat leftovers? Store bars in an airtight container at room temperature for up to 5 days. Reheat in the microwave for about 15 seconds before eating to restore softness.
Can I freeze this dish? Yes, these bars freeze well. Wrap them individually in plastic wrap and store in a freezer bag for up to 3 months. Thaw at room temperature before serving.
What wine or beverages pair best with this dish? A light herbal tea or coffee pairs nicely with the flavors of the bars, enhancing the breakfast experience.
How can I scale this recipe up for a crowd? Simply double the ingredients and use a larger baking pan. Adjust baking time as necessary, checking for doneness midway through.
What side dishes complement this recipe best? Fresh fruit or yogurt would be excellent accompaniments, providing a light and refreshing contrast to the hearty bars.
How do professional chefs elevate this dish for restaurant service? Chefs often serve these bars with a scoop of yogurt and fresh fruit on top, drizzled with honey for a gourmet touch.
Serving and Presentation Guide
• Traditional Presentation: Serve bars on a rustic wooden board with a side of fresh fruit and a drizzle of honey for a homey, inviting display.
• Modern Plating Ideas: Stack bars on a sleek white plate with a dusting of powdered sugar and a side of yogurt, utilizing negative space for a contemporary look.
• Accompaniment Suggestions: Accompany with a small bowl of mixed berries and a dollop of Greek yogurt to add freshness and creaminess to the dish.
• Special Occasion Presentation: For special occasions, consider garnishing the bars with edible flowers or fresh mint leaves for a colorful and elegant touch.
Conclusion
I hope you give these Oatmeal Breakfast Bars a try in your kitchen.
They’re not only delicious but also healthy and easy to make.
Your mornings will be transformed with this nutritious and satisfying breakfast option.
Enjoy sharing them with friends and family!